

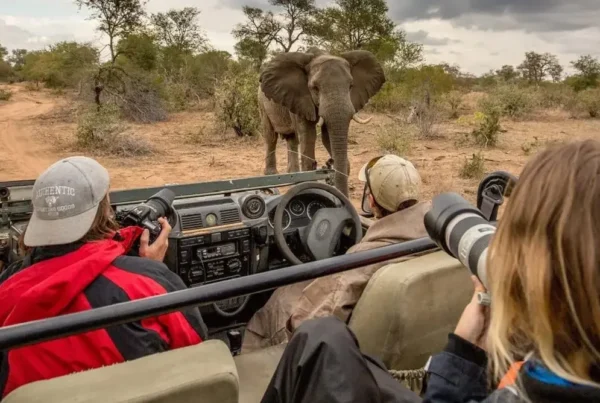
The Greater Kruger Area is home to exceptional biodiversity, including the African Big 5 (lion, elephant, leopard, rhino, and buffalo), as well as antelope species, hippos, crocodiles, hyenas, giraffe, zebra, and a wide variety of birdlife. Wildlife encounters vary depending on the season, location, and natural movement of animals, but there are ample opportunities to capture powerful wildlife moments throughout the project.
Volunteer Abroad for Wildlife Photography in Africa
Develop your photography skills while supporting ethical conservation through wildlife photography volunteering in Africa. These programmes combine hands-on photography training with meaningful conservation engagement, offering a unique way to document wildlife while contributing to awareness and protection efforts.
Africa’s diverse landscapes and iconic species provide exceptional opportunities for ethical wildlife photography. Volunteers work alongside experienced guides and mentors to capture compelling imagery that supports conservation storytelling, education and long-term wildlife protection.
What You'll Do
-
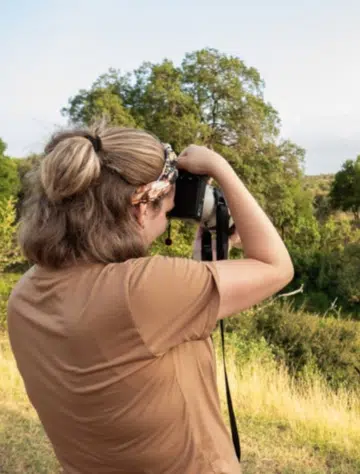
Capture Wildlife Imagery In Natural African Habitats
Photograph wildlife behaviour across diverse ecosystems and settings.
-
Develop Photography Techniques And Field Skills
Learn camera handling, composition and shooting techniques in the field.
-
Participate In Ethical Wildlife Photography Workshops
Build skills focused on ethical practice and responsible storytelling.
-
Support Conservation Through Visual Documentation
Create imagery used for awareness, education and conservation outreach.
-
Engage In Image Review And Skill Development Sessions
Refine your work through guided feedback and group critique sessions.

Wildlife Photography Projects Across Africa
Projects combine photography skill development with ethical wildlife engagement. As a volunteer, you might focus on photographing iconic African species, develop technical photography skills, and contribute visual assets for conservation awareness, with individual projects available to suit your interests and experience level
WILDLIFE PHOTOGRAPHY
Why Volunteer in Wildlife Photography?
Wildlife Photography
Wildlife photography volunteering offers a rare opportunity to develop creative skills while contributing to conservation awareness and ethical wildlife engagement.
Key benefits include:
- Gaining practical wildlife photography field experience
- Learning ethical approaches to photographing wild animals
- Developing technical and creative photography skills
- Contributing imagery that supports conservation awareness
- Experiencing Africa beyond traditional wildlife tourism
These projects are ideal for aspiring photographers, creatives, gap year travellers and conservation-minded volunteers.
WILDLIFE CONSERVATION
Who Can Volunteer?
Wildlife Photography
Wildlife photography volunteer programmes are open to participants of all backgrounds. No professional photography experience is required, as training and mentorship are provided throughout the placement.
These projects are suitable for:
- Beginner and aspiring photographers
- Students and graduates
- Creative travellers and content creators
- Gap year and long-term travellers
Whats Included and Ground Support
Accommodation close to project
Meals or self-catering facilities (varies by project)
Airport transfers and local orientation
In-country support and project supervision
Photography training and guided field sessions

Start Your Wildlife Photography Volunteer Journey
Wildlife photography volunteering in Africa offers a powerful way to develop creative skills while supporting ethical conservation storytelling. Whether you’re building a portfolio, learning new techniques, or travelling with purpose, these programmes provide a meaningful and immersive path into wildlife photography.
Project FAQS
Do I need prior photography experience?
No prior photography experience is required. The wildlife photography programme welcomes participants at all skill levels, particularly those with a strong interest in learning and capturing Africa’s wildlife. Experienced guides provide structured training and mentorship to help develop your technical skills and creative approach, whether you are just starting out or building confidence behind the camera.
Will I be able to photograph the Big 5 at this project?
While the African Big 5 are present in the wider area, sightings cannot be guaranteed, as animals move freely in this wilderness environment. The project is located along the Olifants River, which regularly attracts elephants, hippos, crocodiles, and a wide range of bird species, offering consistent and rewarding photographic opportunities.
Will I benefit from this course if I am an established photographer?
This project covers some foundational aspects of wildlife photography, but it also offers opportunities to develop specialised skills such as macro photography and astrophotography. Established photographers seeking a more focused or advanced experience may wish to explore the Wildlife Photography Internship for a project tailored to specific professional goals.
How does my photography contribute to conservation efforts?
The wildlife photography volunteer programme often works in collaboration with research institutions and conservation organisations. Images captured by volunteers may be used to monitor animal populations, document behaviours, raise awareness of conservation challenges, and support educational materials. Your photography plays a role in both conservation research and storytelling that helps protect Africa’s wildlife.


